Showing posts with label carnival. Show all posts

Thursday, April 9, 2015

Ticket to the Freak Show... Opens April 11th!

Step right up folks! You won't see anything like this anywhere else. Freaks and oddities of all types and kinds... right here for your viewing pleasure. And I've got your ticket!

I am beyond excited to present to you my most recent collection of art dolls, live and in person for the very first time... this Saturday, April 11th at Torche' Galerie. Inspired by my love of everything circus, as well as the recent FX series hit American Horror Story: Freak Show, this collection is my most favorite of all! And not only will I have 6 art dolls on display at this show, but I will also have 2 new whimsical vintage style collages showcased!

Torche' Galerie's 2nd Anniversary Exhibition features a whole host of talented artists in all types of mediums including sculpture, photography, charcoal, watercolor, acrylic, collage, film, mixed-media and so many more categories of intriguing contemporary art. Torche' Galerie is like a little slice of an upscale New York City gallery with a friendly and inviting atmosphere... right here in NJ! And the opening night reception — which many of the artists attend — will blow you away.


Opening Reception 
Saturday, April 11th, 2015
7pm - 10pm
500 Main Street, Belmar, NJ 07719

So come join me at the opening reception and view my latest selection of whimsical art dolls and collages, as well as the work of 50 inspirational artists! If you can't make it to the Opening Reception, the show is up through the month of June. Hope to see you there!

Thursday, June 12, 2014

No Clowning Around This Time!


So... right after my last big project — creating 30 custom Knock Down Dolls — I had to go right into a marathon of Art Doll making! With only 17 days until a gallery submission deadline, there was no clowning around for this girl. I had to accomplish what had previously taken me more than 3 times that to do! So... I neglected housecleaning, laundry, grocery shopping, the beach (that one hurt a little!), and I worked night and day, sleeping a lot less than usual... for more than two weeks! But I did it. I created 9 dolls from start to finish in that amount of time. It was a whirlwind of art making, but at the same time it was an incredible journey...

I'm not a big fan of being on an extremely tight deadline. I'm definitely more from the camp that "art takes as long as it takes." Because... well... it does!

However... needing to create quickly helped to keep me from overthinking things. Bonus! I'm definitely an overthinker... pondering the many, many facets for each stage of dollmaking. But I didn't have that luxury this time, and it kind of turned out to be a blessing. I committed to my decisions more quickly... and without much regret. Double bonus!

At times I felt like I was possessed... or that I had sold my soul to the devil. But that was okay, because My Devil Is Da Bomb! Not only do I love making these dolls, but I enjoy coming up with whimsically clever names for them as well. From a design standpoint, don't ask my why my devil has glitter star pasties and a feather boa skirt. That's just my very odd brain hard at work!

Have you ever made a Snow Angel? Yeah... me too! I couldn't very well have a devil without an angel.... so I thought I'd make her white as snow. For good contrast. With a recycled blouse as her gown, some vintage jewelry to keep her afro in check, a repurposed bow, and pearls from my stash... she really is angelic.

For a long time I didn't like my Tooth Fairy. She was a toughie. But I gave her a tulle shawl to match her tutu, a vintage jewel for her halter top and a couple of adorable blue bows for her hair buns... and I fell in love. I actually won't stop — on any of my dolls — until I fall in love. This just took a bit more falling until the love part.

Having grown up near the boardwalks — and knowing that the gallery show would be for two summer months — I had to include some circus-carnival-inspired pieces. Welcome To The Big Top was one of my favorite ideas and I really enjoyed making her a circus tent style dress! Oh, and that hair! Totally over the top.... just how I like it.

And sticking with the circus theme, Dottie The Clown might just be my favorite doll from this group. This tender heart touched my heart the most. So much emotion from that face!

And from the whimsical — and more delicious — memories of my boardwalk days... came Candy Apple. I actually used to eat those things until I felt like I was going to break my teeth one day. So I switched to caramel. That art doll will be next!

And of course, no boardwalk, carnival or circus visit would be complete without an Oops! I Dropped My Ice Cream moment! I can say that I have dropped my ice cream before. And yes... I scooped up the part not touching the ground and resumed eating — without so much as skipping a beat!

So that's a sneak peek at some of the dolls I created for this series. And I am so excited to share with you that Torche' Galerie in Belmar, NJ has accepted all 9 of my dolls for their summer show! I am thrilled beyond words!! You can see the dolls in person at the exhibit opening on Saturday, July 12th, from 7-10. I'll let you know all the details as we get closer!

Thursday, December 12, 2013

Don't Mess With My Candy (Apple)!

After a very quick two weeks of jewelry-making... I needed a bit of play time again. I felt like painting, but I wasn't sure what to paint. Then I remembered that I had a bunch of drawings in my sketchbook.

I had done them awhile back... in an attempt to find my own personal style (which I'm finding out is a constant quest!). So I thought, these sketches are very much me... let's see how the candy apple looks in paint!

I also thought it might be a great addition to my current gallery show, since I had sold a couple of pieces already. But when I finished the painting, I loved it so much... I decided to keep it!

Oh, and I have no idea where the eye patch (complete with a red rhinestone heart) came from... it just popped into my brain while I was working on the piece. I think I really wanted to get the point across, not to mess with my candy! And a 3D element on any of my pieces always adds that touch of whimsy I love so much.

Tuesday, June 12, 2012

Happy Anniversary To Me!

I cannot believe that 2 years ago I quit my job to become a full-time artist! It seems like just yesterday that I took the leap of faith to make a hand-made life for myself.

In that time, I've written 198 blog posts, sent 3,648 tweets, finally joined Facebook, set up a YouTube channel and a Pinterest account, updated this blog and my website, vended at 14 art shows (including one burlesque show!), and sold 253 items in my Etsy Shop! Oh... and I've made a lot of art!

I created more than 120 pieces of one-of-a-kind jewelry, 125 Knock-Down Dolls, 50 Carnival-style Assemblages, played around with freaks at the circus side show, and even started a brand new line of folk art style rag dolls! I sold my art in over a dozen retail stores, got 9 pieces of art into juried gallery shows (even won an award!), and created lots of individual pieces of all shapes and sizes.

I distracted myself with refinishing furniture, giving birth to twins (dolls, of course), going to lots and lots of flea markets, yard sales and antique shows, as well as taking workshops from several very talented mixed media artists that I admire. Oh... and my other paying job... freelance graphic design!

I even partnered with my mom to launch Creativity By-the-Sea — a seashore art retreat right here in my home town — which attracted more than 75 attendees and plenty of high praise! It was such a great success that we're doing it again next April!

But it hasn't been a piece of cake, either. There have been lots of "almosts" too. A very unique copywriting job that fell through. An opportunity for online teaching that didn't work out, retail stores that never sold a thing, a licensing opportunity that I was turned down for, and dozens of other tiny losses. Add to that a stagnant economy and I have to say that these hand-made times are tough. In fact... I'm probably going to have to get a job (so, ummmm... let me know if you hear of anything!).

Being your own company means you do everything.... leaving little time for laundry, dishes, or vacuuming. Making money means spending money... also very scary, as your outcomes are never guaranteed. Working hard means lots of days exhausted and spent. But doing something you love certainly helps. Now to just find a way to keep doing it!

Despite the difficulties, I am amazed at what I've been able to accomplish in such a short amount of time. I learned a lot about myself... about selling in the real world and a social media world... about what works and what doesn't... and I've changed directions as many times as I have categories of art that I love!

So, I'm still learning and changing and growing.... and trying to be very gentle with myself. Because... that's what we should do when we follow our dreams.


Saturday, March 3, 2012

Join Me At Creativity By-the-Sea...

Sunday, March 25th
Creativity By-the-Sea, Ocean Grove, NJ

Take a stroll with me down to the boardwalk... or the circus.... or the carnival.... as you learn how to age and everyday items like wood, plastic, clay, fabric, paper and more. Bring back memories of those fun arcade games as you create a whimsical, folk art style, dimensional shadowbox from the ground up using vintage and everyday items. Starting with an unfinished wood box that you'll paint and decorate — you'll learn easy techniques for making new things look old. These are methods that you'll be able to use time and time again on your own future projects.


For information and registration, check out the Creativity By-the-Sea website and sign up to come play with me! Or choose from some of the 2 dozen classes offered at this art retreat on the Atlantic Ocean... we'd love to have you!

Sunday, January 29, 2012

Shop Spotlight: Red for Valentines Day...

Looking for a hand made gift this Valentine's Day? I thought I'd showcase some of my very own reddish creations, all available in my Etsy shop...

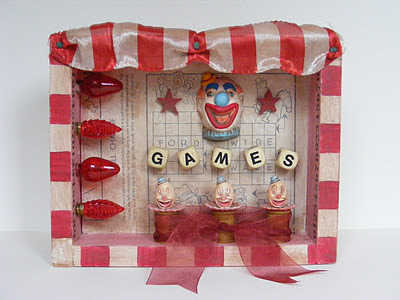
Step right up for this one-of-a-kind mixed media assemblage — a tribute to my favorite carnival game!

Check out this gorgeous ruby red necklace, upcycled from a couple of vintage brooches and a heart charm.

Looking for something a little more fun and whimsical? How about one of my custom Tillie Knock Down Dolls? Each one is numbered and signed by be for the ultimate in carnival collectibles. This little guy is number 69 (and no! I didn't pick that one on purpose!!).

Know someone who loves to sew for the holidays? This jingle thimble necklace has all sorts of re-purposed sewing notions!

Wish you were somewhere over the rainbow? This pair of "original" ruby slippers was made from a pair of vintage pumps and like a gazillion faux gemstones! A great gift for that Oz fan in your life.

And that's just the red stuff. I've got tons of collages, assemblages, jewelry, dolls, carnival themed stuff and more... in every color of the rainbow. So check out my Yesterday's Trash Art Shop and buy handmade this holiday!

~Michelle xoxo

Thursday, October 20, 2011

Thoughtful Thursdays: What a Difference A Year Makes!

I was looking for blog fodder and I checked to see what I was doing this time last year. I made my own self jealous when I realized that I was in Portland, Oregon attending Art & Soul! One thing that stood out was a class I took with Tory Brokenshire called... Yes I Want That Drill Press & More!

It was there that I got the chance to man-up and learn how to use all kinds of power tools including a drill press, belt sander, jig saw, chop saw and nail gun. Can I just tell you that I want all of them! In the workshop we got to build our very own shadowbox from raw lumber. Our manly helper, Gil, was very encouraging!

Tory liked my finished assemblage so much, she encouraged me to want to make more! At the time I thought to myself, "I think I see one in every color scheme, hmmmmm.... maybe starting with pink?" And that's just what I've been doing!

To date, I think I've made 33 carnival-inspired assemblages along the same lines as the original, and using the same basic structure I learned how to make in class. Each time I create a set, I build on what I have learned from the previous versions, and try new things!

I really do like exhausting the possibilities using the same structure. It's really fun to think inside the box! What types of projects do you like to create that have a little something in common?

Tuesday, October 18, 2011

Amusing Myself...

As promised... I said I would show you what I'm doing to AMUSE myself with my latest carnival-inspired assemblage! I found that I needed something to go on the sides of the piece, but did not want to add bulk or take away from the elements inside by adding a bunch of dimensional objects.

So I found some funky circus type and made a gigantic stencil... using half of the word AMUSEMENT on each side...

Painted it up in a bluish-magenta pink and cool ivory (and over-thought those choices about 17 times)! But in the end, was satisfied with my choices. It really didn't matter because I just love the look of painted wood.

Then it was time to make some curtains. I didn't have any pink fabric that I liked (isn't that always the way), so I got out my trusty unbleached muslin, and tore it into the shapes I needed. I colored it with a light wash of pink acrylic paint. Then I distressed the heck out of it with sandpaper and an additional wash of browns.

Distressed a narrow piece of white ribbon to string them on (again, not having what I envisioned on hand), and ta-daa! It's curtains for Giselle! And of course, had to make matching distressed curtain ties. Love getting lost in the details!

Speaking of details, the sliver of wooden drawer above the curtain was looking a little bare, so I added some stars, with a touch of vintage bling... of course!

And now, I just have this giant hole to fill (okay, well it's not really "giant" — only in my mind). And for days I've been trying and rejecting a plethora of objects to compliment this piece. It's been tough because I don't have a specific "story" in mind... I'm going full out organic in my process here.

But I've picked out, picked up, put down, worked up and settled on a few key pieces and should have it all "Twisted" up by next week. Until then kiddies...

Thursday, October 13, 2011

Thoughtful Thursdays: Fit For A Man Cave!

Recently, I did a commission for someone who grew up in Coney Island, NY. Having spent lots of time at the boardwalk and playing games as a kid, he was drawn to my Tillie-style Knock Down Dolls. Turns out, he actually has a boardwalk-themed game room and wanted to get 3 dolls for his collection of arcade memorabilia.

I was happy to oblige and even threw in a vintage-looking sign I made for Tillie photo shoots! But what i really enjoy is the fact that — even though my style tends to be a little on the whimsical side — I actually have some creations that appeal to the menfolk!

Long live the man cave!

Tuesday, October 4, 2011

Gettin' Twisted...

Well... work on my Twisted assemblage is moving right along... and a little better than I had anticipated. That's always a pleasant phenomenon! I decided to go with Jesus as my "I" and I think I'm going to paint the letters ivory to match him.

I built a shelf out of a cardboard box, because I wanted the letters to be far forward, and not toward the back... in the shadows. Glued it in using my favorite multi-media glue.... DAP Tub & Tile Caulking! Wanna know why I love it so? Because caulking is made to fluctuate with temperature and humidity changes... just like the tiles in your bathroom. And so it doesn't get too hard and crack off. That's my little tip for today. Back to the assemblage...

I papered the entire inside of the drawer — and over the new shelf — with vintage book pages. For this piece I used pages from The Diary Of Anne Frank. But I don't really pick titles that are pertinent to the assemblage... I actually pick based on how aged the pages look, and how supple they are. These were perfect!

I also tried something different with this piece. Usually, I age the pages with some hue of brown acrylic paint... but these pages were rather delicate and the drawer had some ridges in it. I didn't want to be treating them so harshly as to rub on paint and wipe it back off. So I thought I would try using wood stain... and OMG!! Can I just tell you... that I may never go back to acrylics for aging vintage book pages again!

I got to work on Giselle over the weekend... added some volume to her skirt, distressed her like she'd been around for decades, and hooked her up to her new station all twisted and such. But I'll save that for the next update. Until then my twisted little mixed-media followers... Bwwahhahaahaa!