I have to admit that I'm not a big fan of computers, social media, web surfing and blog reading. They tend to just suck you in. You'll just go see what so-and-so is up to.... oh, what's that link.... hey, this is a cool article... hmmm, an ad for cat raincoats... better check that out! And before you know it, hours have passed by. And it may seem strange coming from someone who's job as a graphic designer had her on the computer 8 hours a day for more than 15 years... but when I get home from work, the last thing I want to do is sit in front of a computer. Until Pinterest, that is!
With a name derived from a "pinboard" of
"interests" this site lives up to and exceeds the idea of a vision
board. It's the one place in this world of social media that is pure
inspiration.
And it's so much bigger than that cork board over your desk. I mean... just look at all this amazing inspiration! Every time I open my Pinterest newsfeed, it's chock full of yummy eye candy. It really is addicting... but I don't mind. It inspires my art and my life. It's all good.
I can"pin up" an unlimited amount of ideas in as many categories as I like, and organize them however it suits my fancy! I've got sections for inspirational art, stuffies, dolls, collage, journaling, circus-related items, personal imagery, mark-making and scribbles, food, travel, home decor, organizing, studio ideas and so much more!
Since I've been on a quest to define my own personal style, Pinterest has been very helpful for me. I just click on one of my pinboards and voilà! Here are all the things I'm inspired by... with notes about what in particular I like. It's just so exciting... it makes me want to get off the computer and make something! I feel like it's one of the most valuable tools in my art box!
You can find me on Pinterest at SideShowShelly. Check out my boards and see what inspires me. You never know what may peak your interest!
website | contact | e-mail list | shop | the artist | gallery | licensing | publications | events | etsy
Wednesday, October 2, 2013
Wednesday, September 25, 2013
Let's Not Get Into Fisticuffs!
...but we can certainly get into making a funky fabric cuff! After months of painting all kinds of folk art, primitive and cutesy girls, I had an urge to totally change directions and make an artful adornment for my arm. I did a little research and found this awesome tutorial and wanted to get started right away!
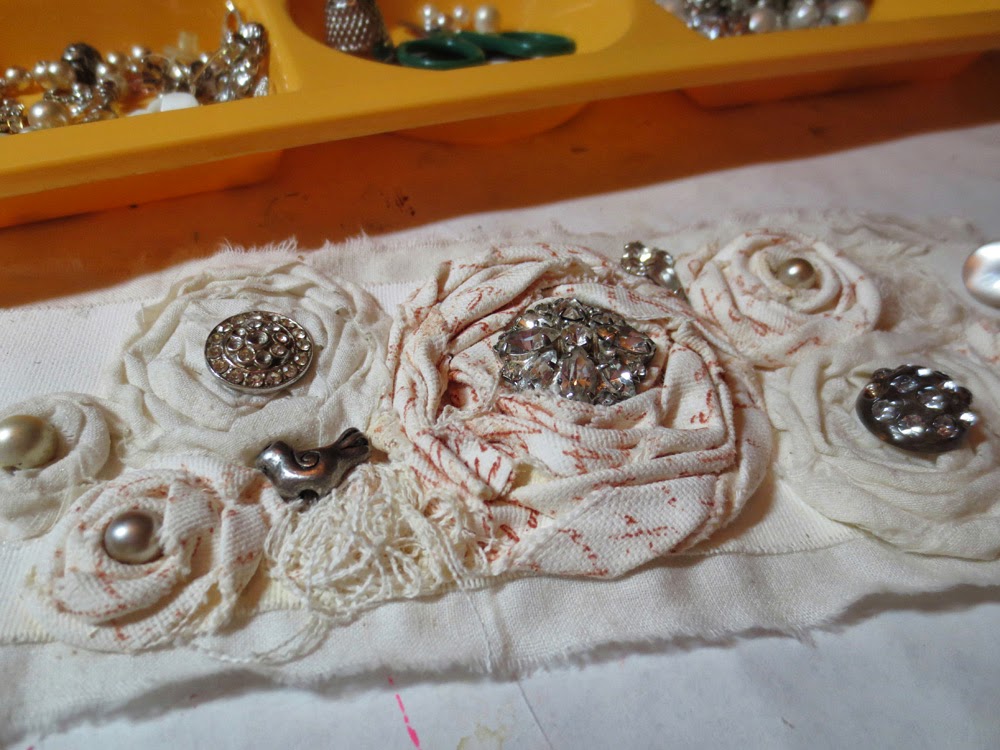
I also remembered that my lovely and talented friend Claudine Hellmuth had done a how-to video on creating a convertible brooch pendant with her StickyBack Canvas product. So I took her flower idea and used it as a jumping off point for this fabric cuff. Her technique made it super easy and fun. The base of the cuff and the flower are both made with StickyBack Canvas (oh, and I saved the extra strings to make the little nest of fibers there).
The cool thing about StickyBack is that... well... it has a sticky back! So I peeled off the backing and stuck my cuff onto a piece of muslin that was a half inch wider than the base. Just to create a little interest around the edges. Of course I'm doing things totally out of order because I was just so excited (and kind of making it up as I went along)!
And then it was time to add some accent flowers. I wanted to alternate between the stamped StickyBack Canvas and the muslin, but when it came time to add my second flower... the perfectionist side of me had a few questions. What if the placement is off? What if you come up short? Or it's not centered? So I had an idea! I took the waxy paper from the StickyBack and used it as a non-stick base for my flowers. I put down some tacky glue, made the flower the exact size I wanted it, and let it dry overnight. Peeled it off the next day and.... voilà!
A perfect flower I could place anywhere I like! Just a little Tacky Glue to affix it to the cuff... and we're on our way!
Made more flowers. Picked out some vintage baubles to accessorize. I sewed the buttons on. Oh, and I don't know how to do a button hole on my sewing machine yet, so I just cut two slits in the fabric. Hey, it works. More flowers. More fiber nest thingies...
Picking out jewels and beads to match was lots of fun. Went through like a gazillion combinations. And sewed them on very carefully. It took many decades to acquire all that junk.... ahem... I mean, jewels.
When I was done I had completely surprised myself. I thought. I searched. I gathered. I conquered. One of the things about the internet that I actually love... You can think of something you want to do... sit in one place and do tons of research... and find what you want to create... and then get to create it right then and there! Ahhhh... impatient crafters... we are saved!
And look at all that textured goodness. Isn't it just yummy! I love the tattered and worn look this funky fabric cuff has. Combined with vintage goodies from my stash... this new accessory is going to get worn out in no time. Or is that worn in? Hmmmmm.....
I also remembered that my lovely and talented friend Claudine Hellmuth had done a how-to video on creating a convertible brooch pendant with her StickyBack Canvas product. So I took her flower idea and used it as a jumping off point for this fabric cuff. Her technique made it super easy and fun. The base of the cuff and the flower are both made with StickyBack Canvas (oh, and I saved the extra strings to make the little nest of fibers there).
The cool thing about StickyBack is that... well... it has a sticky back! So I peeled off the backing and stuck my cuff onto a piece of muslin that was a half inch wider than the base. Just to create a little interest around the edges. Of course I'm doing things totally out of order because I was just so excited (and kind of making it up as I went along)!
And then it was time to add some accent flowers. I wanted to alternate between the stamped StickyBack Canvas and the muslin, but when it came time to add my second flower... the perfectionist side of me had a few questions. What if the placement is off? What if you come up short? Or it's not centered? So I had an idea! I took the waxy paper from the StickyBack and used it as a non-stick base for my flowers. I put down some tacky glue, made the flower the exact size I wanted it, and let it dry overnight. Peeled it off the next day and.... voilà!
A perfect flower I could place anywhere I like! Just a little Tacky Glue to affix it to the cuff... and we're on our way!
Made more flowers. Picked out some vintage baubles to accessorize. I sewed the buttons on. Oh, and I don't know how to do a button hole on my sewing machine yet, so I just cut two slits in the fabric. Hey, it works. More flowers. More fiber nest thingies...
Picking out jewels and beads to match was lots of fun. Went through like a gazillion combinations. And sewed them on very carefully. It took many decades to acquire all that junk.... ahem... I mean, jewels.
When I was done I had completely surprised myself. I thought. I searched. I gathered. I conquered. One of the things about the internet that I actually love... You can think of something you want to do... sit in one place and do tons of research... and find what you want to create... and then get to create it right then and there! Ahhhh... impatient crafters... we are saved!
And look at all that textured goodness. Isn't it just yummy! I love the tattered and worn look this funky fabric cuff has. Combined with vintage goodies from my stash... this new accessory is going to get worn out in no time. Or is that worn in? Hmmmmm.....
Labels:
antique,
bling,
claudine hellmuth,
cuff,
fabric,
how to,
jewelry,
muslin,
ranger,
rhinestone,
stickyback canvas,
studio,
technique,
vintage,
Vintiquities
Wednesday, September 11, 2013
Have My Cake and Paint It Too...
One of my most recent journal pages started out with a sweet theme and just got sweeter from there! With cake as the subject matter... can I really go wrong?
If you know me, any form of pink and teal or blue can be a predictable starting point. This time I thought I'd add a little brown and cream for good measure (a baking reference...get it!).
I had actually painted the cake on the page before the girl was there... part of my brave new strategy of just doing something and not worrying about how it will end up in the final composition. But, I have to confess that I liked it so much, I didn't want to cover it up.
So, of course when I added the girl, she had to be eyeing up that slice of chocolate cake with strawberry frosting. Mmmmmmm. I see that little smirk on her face! She's totally thinking.... MINE!
When I create these pages, I like to alternate painting, drawing, embellishing and pasting stuff on. I kinda sorta randomly pick from my ephemera pieces that just look good on the page... like this number 5 from a flash card. I think I chose this because the nicely aged cardstock went well with the polka-dotted scrapbook page next to it. And because 5-year-olds like cake!
But then i found this cute little spanish language flash card that had a 5 on it... and so I added that to the piece as well. And I just love sounding out (say it with me now...) OO-nah moó-CHA-chah.
Even more delightfully delicious ephemera kept finding its way to my cakey journal page and this one was probably my favorite. The celebratory birthday girl and boy were precisely placed over top of the music page so that the words "be good" appeared between them.
It's funny how when I'm working on a page, it feels like I'm on auto pilot. Not in a bad way. But I just make moves and then work with what's there. Then I make more moves and add more, tweak more and play more until the layout is pleasing to the eye.
But when I look back at all my detail photos, I see dozens upon dozens of carefully calculated decisions... a warm wash of paint here... some extra glitter there... a pencil scratch here... a candy wrapper there.... or the smallest of elements that really felt good at the time. And then I remember what a joy it is to create in the moment... even though my goal is a finished page.
So I guess I can have my cake and paint it too!
If you know me, any form of pink and teal or blue can be a predictable starting point. This time I thought I'd add a little brown and cream for good measure (a baking reference...get it!).
I had actually painted the cake on the page before the girl was there... part of my brave new strategy of just doing something and not worrying about how it will end up in the final composition. But, I have to confess that I liked it so much, I didn't want to cover it up.
When I create these pages, I like to alternate painting, drawing, embellishing and pasting stuff on. I kinda sorta randomly pick from my ephemera pieces that just look good on the page... like this number 5 from a flash card. I think I chose this because the nicely aged cardstock went well with the polka-dotted scrapbook page next to it. And because 5-year-olds like cake!
But then i found this cute little spanish language flash card that had a 5 on it... and so I added that to the piece as well. And I just love sounding out (say it with me now...) OO-nah moó-CHA-chah.
Even more delightfully delicious ephemera kept finding its way to my cakey journal page and this one was probably my favorite. The celebratory birthday girl and boy were precisely placed over top of the music page so that the words "be good" appeared between them.
It's funny how when I'm working on a page, it feels like I'm on auto pilot. Not in a bad way. But I just make moves and then work with what's there. Then I make more moves and add more, tweak more and play more until the layout is pleasing to the eye.
But when I look back at all my detail photos, I see dozens upon dozens of carefully calculated decisions... a warm wash of paint here... some extra glitter there... a pencil scratch here... a candy wrapper there.... or the smallest of elements that really felt good at the time. And then I remember what a joy it is to create in the moment... even though my goal is a finished page.
So I guess I can have my cake and paint it too!
Labels:
cake,
folk art,
journal,
mindy lacefield,
oil pastels,
play,
watercolor paper
Wednesday, September 4, 2013
Music To My Hands...
Okay... so if you've been reading my blog lately, you know that I've kind of been a little obsessed about painting faces in my art. I'm trying to figure out my own style and in the process have pushed the boundaries a bit on how to go about actually painting. Why not, right?
I've been doing a lot of odd things lately to try and get out of my comfort zone, and this project was no exception. I took an old painting I wasn't very fond of and just painted right over top of it! That was a first for me. But with each exercise, I'm learning to let go more and more.
Recently, I tried painting an entire piece with just my left hand. So this time I thought I'd paint a girl using just my fingers. Good old fashioned finger painting. I figured (or should I say... fingered) that it would be pretty low pressure with low expectations... like kindergarten! That sounds like fun. It actually gave her face a lot of depth, dimension and texture. Yay!
I dressed her in purple, allowing the background to show through a bit. Not sure why, but I was building up layers slowly (still using my fingers only!) and liked it at this point. I wanted to add something, and this torn music sheet title fit in perfectly with the stripes in the background. Plus she looked a little sad, so I thought the title was perfect. Learning not to question everything to death... I just pasted it down!
The scene needed a little something more and so I added a cardboard house.
Now that the left side was taken care of... the right side looked a little bare. I had these lovely peels of cardboard left over from the house — having torn them off to expose the corrugated texture beneath — and so I decided to turn them into a tree.
Okay... so the left and right were taken care of... but now the top seemed a little empty. So I added a little folk artsy crow. And last minute, I decided to utilize some of the extra music paper and give him a song to sing. Love it when those unintended ideas just pop up based on the materials I'm using. Good times.
When I stepped back and looked at my finger painting as a finished piece... I was in awe over how primitive it looked. It wasn't exactly my intention to make it go in that direction... but all that tap, tap, tapping of my fingertips... and smearing lines of paint with my hands made it so.
I really did feel like a kindergartener and getting my hands all messy with paint... not caring if one color got on another... and just going with the flow... was a spectacular lesson in letting go.
So... there goes my everything.
I've been doing a lot of odd things lately to try and get out of my comfort zone, and this project was no exception. I took an old painting I wasn't very fond of and just painted right over top of it! That was a first for me. But with each exercise, I'm learning to let go more and more.
Recently, I tried painting an entire piece with just my left hand. So this time I thought I'd paint a girl using just my fingers. Good old fashioned finger painting. I figured (or should I say... fingered) that it would be pretty low pressure with low expectations... like kindergarten! That sounds like fun. It actually gave her face a lot of depth, dimension and texture. Yay!
I dressed her in purple, allowing the background to show through a bit. Not sure why, but I was building up layers slowly (still using my fingers only!) and liked it at this point. I wanted to add something, and this torn music sheet title fit in perfectly with the stripes in the background. Plus she looked a little sad, so I thought the title was perfect. Learning not to question everything to death... I just pasted it down!
The scene needed a little something more and so I added a cardboard house.
Now that the left side was taken care of... the right side looked a little bare. I had these lovely peels of cardboard left over from the house — having torn them off to expose the corrugated texture beneath — and so I decided to turn them into a tree.
Okay... so the left and right were taken care of... but now the top seemed a little empty. So I added a little folk artsy crow. And last minute, I decided to utilize some of the extra music paper and give him a song to sing. Love it when those unintended ideas just pop up based on the materials I'm using. Good times.
When I stepped back and looked at my finger painting as a finished piece... I was in awe over how primitive it looked. It wasn't exactly my intention to make it go in that direction... but all that tap, tap, tapping of my fingertips... and smearing lines of paint with my hands made it so.
I really did feel like a kindergartener and getting my hands all messy with paint... not caring if one color got on another... and just going with the flow... was a spectacular lesson in letting go.
So... there goes my everything.
Labels:
crow,
finger painting,
folk art,
house,
mixed media,
outsider,
primitive,
symbols,
there goes my everything,
tree
Wednesday, August 28, 2013
Patch It Up...
Not too long ago, I got Lilla Rogers' book I Just Like To Make Things. In it, she had a few creativity exercises, and I fell in love with this patchwork looking one! She had us pick several of our favorite colors and then fill in the squares with them. I was so ecstatic with the results, I wanted to use the idea in a real painting.
So I divided a 16"x20" wood panel into 4"x4" squares and went to town. I wanted to keep the colors a bit more muted, so that whatever (or whoever) I painted over top would stand out.
I used the same techniques from my last painting... only this time I used my dominant hand (Spoiler Alert! I actually liked the left handed one better!) But the very dry brush strokes and multiple layers still came through and I love all the scritchy-scratchy detail that produces.
I decided to make her dress black so that it would pop over the pastel background. It worked!
And I ended up giving her a black mouse-eared hat just to balance things out. Of course once I made the hat, it felt like too much black.... and so I emblazoned it with my own little pink mouseketeer logo to create some visual distraction.
Typically when I think I'm done, I'll prop my painting up on the living room couch — opposite where I sit to watch TV. I'll glance over at it every once in awhile to see what I like and what I don't. So after staring at it for hours, I went back and added some shadows, and lightened some areas too. It was still a little scary as the Recovering Perfectionist in me didn't want to mess it up.
But the longer I stared at it, the more I saw things I wanted to change. So if it's a choice between leaving it as is (and not being happy), or trying something else to improve it (even if I don't like it)... why not just continue to improve it? And even though she's done... I still see things I'm going to change... and I'm not scared to do it!
Talk about patching things up!
So I divided a 16"x20" wood panel into 4"x4" squares and went to town. I wanted to keep the colors a bit more muted, so that whatever (or whoever) I painted over top would stand out.
I used the same techniques from my last painting... only this time I used my dominant hand (Spoiler Alert! I actually liked the left handed one better!) But the very dry brush strokes and multiple layers still came through and I love all the scritchy-scratchy detail that produces.
I decided to make her dress black so that it would pop over the pastel background. It worked!
And I ended up giving her a black mouse-eared hat just to balance things out. Of course once I made the hat, it felt like too much black.... and so I emblazoned it with my own little pink mouseketeer logo to create some visual distraction.
Typically when I think I'm done, I'll prop my painting up on the living room couch — opposite where I sit to watch TV. I'll glance over at it every once in awhile to see what I like and what I don't. So after staring at it for hours, I went back and added some shadows, and lightened some areas too. It was still a little scary as the Recovering Perfectionist in me didn't want to mess it up.
But the longer I stared at it, the more I saw things I wanted to change. So if it's a choice between leaving it as is (and not being happy), or trying something else to improve it (even if I don't like it)... why not just continue to improve it? And even though she's done... I still see things I'm going to change... and I'm not scared to do it!
Talk about patching things up!
Wednesday, August 21, 2013
Left-Handed Pinky...
Sometimes I get a creative idea in my head and I must execute it immediately! And such is the case with a recent painting of mine... featuring this adorable little girl I named Pinky. You see... I wanted to loosen up my style a bit and so I decided to do an entire painting left-handed! I wanted a real folk art feel, so I took several approaches for this personal assignment...
Starting with my usual techniques, I began to create lots and lots of layers. Lots! It's actually pretty funny (and a little scary!) to see where the face begins in this process. It actually looks like a psychopathic fluorescent baby panda, right?
Ahhhhh... a little better with more layers, but still kind of scary without the eyeballs! But I knew in my head where the piece was going, so I let myself trust the process and let it unfold with my non-dominant hand.
For this painting, I used a very, very, very dry brush for all of the strokes. After I put the paint on the brush, I wiped it almost completely dry onto a paper towel. When I changed colors, I didn't re-use that wet brush... I used another dry brush.
It took a long time and required much patience, especially doing it awkwardly left-handed... but the effect was worth it. Lots and lots of yummy layers of colors that highlighted the paintstrokes beneath.
Layers covered. Layers uncovered. Adding more over top. It really was a deliciously delightful process!
The last thing I did was add the polka dots to the background... because I'm an ass-backwards kind of gal... and because I thought it needed a little something subtle. But when I stepped back... I fell in love with her immediately! She was everything I had hoped for in my mind, before I started to paint. And when that actually happens — besides being a miracle in and of itself — I start to believe in myself as an artist. I start to believe that maybe I really can make the things that I see in my head. And I start to want to create more things because I trust myself.
Now that's one left-handed compliment!
Starting with my usual techniques, I began to create lots and lots of layers. Lots! It's actually pretty funny (and a little scary!) to see where the face begins in this process. It actually looks like a psychopathic fluorescent baby panda, right?
Ahhhhh... a little better with more layers, but still kind of scary without the eyeballs! But I knew in my head where the piece was going, so I let myself trust the process and let it unfold with my non-dominant hand.
For this painting, I used a very, very, very dry brush for all of the strokes. After I put the paint on the brush, I wiped it almost completely dry onto a paper towel. When I changed colors, I didn't re-use that wet brush... I used another dry brush.
It took a long time and required much patience, especially doing it awkwardly left-handed... but the effect was worth it. Lots and lots of yummy layers of colors that highlighted the paintstrokes beneath.
Layers covered. Layers uncovered. Adding more over top. It really was a deliciously delightful process!
The last thing I did was add the polka dots to the background... because I'm an ass-backwards kind of gal... and because I thought it needed a little something subtle. But when I stepped back... I fell in love with her immediately! She was everything I had hoped for in my mind, before I started to paint. And when that actually happens — besides being a miracle in and of itself — I start to believe in myself as an artist. I start to believe that maybe I really can make the things that I see in my head. And I start to want to create more things because I trust myself.
Now that's one left-handed compliment!
Wednesday, August 7, 2013
Fishing With Love...
When you are fishing with love... you can catch whatever you wish! And so catching a few hours of paint time this weekend was exactly what I was fishing for. After all, if I don't love myself enough to let myself play every once in awhile... who will? So I gave my permission!
I couldn't wait to get started! I had these oddly rectangular canvasses for awhile and wanted to do something interesting with them. A whimsical fisher-girl seemed like just the right subject for this substrate. I began with a bluish-greenish monochromatic palette and let it fade into the background, so the girl and fish would stand out!
I'm not sure why I made her eyes so big! They looked a little more proportional in the sketch... but I went with it... chalking it up to a bit of whimsy. Whimsy never hurt anyone!
The pops of color were exactly what I was looking for, and the fish turned out even sweeter than I thought he would. I must confess though... that I drew him on a separate piece of tracing paper until I liked him. This little goldfishie is the 3rd iteration of my original attempt, and a sweetly creative expression of exactly what I was fishing for (with love)! You see... I'm trying to discover my own personal style. And like any good fisherwoman...patience and perseverence is what I need!
I couldn't wait to get started! I had these oddly rectangular canvasses for awhile and wanted to do something interesting with them. A whimsical fisher-girl seemed like just the right subject for this substrate. I began with a bluish-greenish monochromatic palette and let it fade into the background, so the girl and fish would stand out!
I'm not sure why I made her eyes so big! They looked a little more proportional in the sketch... but I went with it... chalking it up to a bit of whimsy. Whimsy never hurt anyone!
The pops of color were exactly what I was looking for, and the fish turned out even sweeter than I thought he would. I must confess though... that I drew him on a separate piece of tracing paper until I liked him. This little goldfishie is the 3rd iteration of my original attempt, and a sweetly creative expression of exactly what I was fishing for (with love)! You see... I'm trying to discover my own personal style. And like any good fisherwoman...patience and perseverence is what I need!
Subscribe to:
Posts (Atom)